Description
Summary
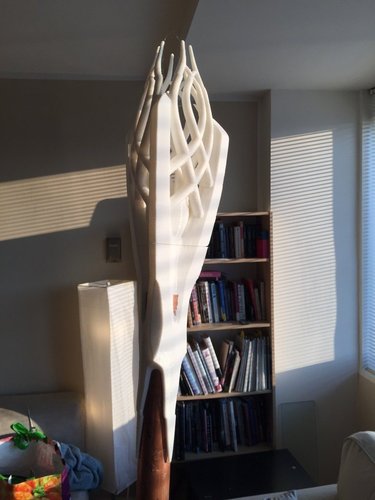
I took jamundsen's design and hollowed it out -- so that you can fit it over a 1" wide copper pipe, drop a light in the middle and wire it up. I built a battery case for the bottom that holds 8 AA batteries, and bought a bulb from superbrightleds.com.
Print Settings
Rafts: Doesn't MatterSupports: Doesn't Matter
Notes:
I printed with white PLA at .3mm resolution, three perimeter shells and probably about 10% infill. There are so many thin pieces that the infill doesn't actually affect much. in retrospect I would probably reduce layer height, but that's because I'm super picky about finish. I would also recommend printing in black and then painting it white. As you'll see in the video, light passes through the white PLA, highlighting uneven paint and other production issues.
I also printed without supports -- but that resulted in some saggy surfaces on the Top section. I currently use slic3r, which doesn't allow for a lot of customization in the way of support materials.
Post-Printing
After printing, the top, bottom and connector pieces can be put together. There are three holes between top and bottom designed to accomodate a 1/8" dowel rod. The connector piece ensures that top and bottom align smoothly. Super glue will hold them together effectively. I initially used a strong epoxy resin, but it left lumps that were very difficult to remove.
After attaching the pieces, I coated in XTC-3D epoxy, then spray painted white. In retrospect, I recommend several coats to keep light from passing through.
The battery pack can be printed and the three pieces attached with epoxy. I used a Plastic Repair Epoxy which gave strength and a little flexibility.
The design is meant to be fitted over a 1" copper pipe. It fits very tightly, so much that it doesn't need glue, and after painting the pipe the fit will be REALLY tight.
I used this bulb:
https://www.superbrightleds.com/moreinfo/miniature-wedge-base/194-led-bulb-19-smd-led-miniature-wedge-retrofit-car/1563/3624/
And this socket:
https://www.superbrightleds.com/moreinfo/empty-bases-sockets/t325-wedge-base-socket-wired/1150/2737/
And this switch:
https://www.superbrightleds.com/moreinfo/installation-supplies/mini-onoff-toggle-switch-wired/1356/3109/
And wired them all together with doorbell wire, running it down to either end of the battery pack.
hh
Recent Prints (1)
More from this category


AC-PENDANT-013
Perfect for GOLD OR SILVER jewellery. OR PRINT PLA Please contact us for any inquiries and modifi...
1 ❤️
0 💬
0 ⬇️
$3.0
size 11 ring
Customized version of http://www.thingiverse.com/thing:217734 Created with Customizer! http://www...
2 ❤️
1 💬
0 ⬇️
Free

Comments (4)
Sign in to leave a comment.
Thanks Bob. The build turned out perfect! Kudos. I was unable to include a photo of the finished project in the comment so I included it with my avatar pic.
Looks awesome! You mention a video in your description but I couldn't find that. I was interested in seeing how it was assembled.
Featured in Pinshape's staff picks week of November 13th: https://blog.pinshape.com/best-things-to-3d-print-november-13-2015/