


Summary There are only 44 pieces))) is not difficult to understand. Screws: M3, M5, M8
Small video:
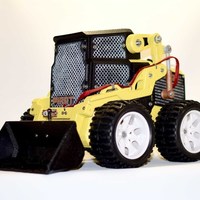
Weight is only 2,8kg (6,17LB)
Size: 400mm x 270mm x 260mm
Working area printer 18x18 mm minimum
I used plastic pla. After printing, the parts were painted textured paint (anti gravel). And only then I painted the usual paint. So I get the effect of an old metal
Motors: https://www.hobbyking.com/hobb...
These powerful motors, but the speed will be less: http://www.hobbyking.com/hobby...
Big servo: https://hobbyking.com/en_us/ho...
Mini servo: https://hobbyking.com/en_us/ho...
Motor on aliexpress: https://ru.aliexpress.com/item...
12MM Hex connector: http://www.ebay.com/itm/3-4-5-...
ESC: http://www.hobbyking.com/hobby...
Two on the left side of the motor are connected in parallel to a single speed controller. the right side is also parallel to the second speed control. Further speed controllers are connected to the receiver from the model aircraft equipment. the first and second channel. Control equipment of RC Planes.
I use this: http://www.hobbyking.com/hobbyking/store/__8992__Turnigy_9X_9Ch_Transmitter_w_Module_8ch_Receiver_Mode_2_v2_Firmware_.хтмл
(but it can be less expensive and does not matter.) how to configure the console's hard to explain in a few words. each country has its own forum on aircraft modeling. There, people can easily prompt to configure the remote. Simply place a link to the video, and they understand everything. Now the international forum: http://www.rcgroups.com/forums...
Loading prints...
RC Mini Loader
Creative Commons Attribution-NonCommercial-ShareAlike
You can distribute, remix, adapt, and build upon the material in any medium or format for noncommercial purposes only, with attribution and under the same license.
 Licensed under CC BY-NC-SA
Files Included
44 downloadable files:


Loading comments...