
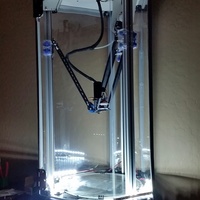


These are the brackets needed to make an enclosure for your rostock max v2. You will need 3 base and 3 top pieces. You can print 3 at a time with the build area.
Locate the brackets on the extrusions and bolt the brackets to the rostock's top and base using 6-32x.75" bolts with nuts (M3 x20mm bolts will work too). You will need to drill holes in your printer. I used one sheet of 36" x 48" x .093" acrylic http://www.homedepot.com/p/OPTIX-36-in-x-48-in-x-093-in-Acrylic-Sheet-MC-09/202038045 and one piece of 1/8" x 12" x 36" acrylic for the door. Cut all sheets to 29" in length with a plastic scraping cutter or saw and cut the .093" sheet into 3-6" widths and 2-12" widths for the enclosure sides. All hardware is 1/4-20 nyloc nuts and 1/4-20 x 7/8" SHCS, but I would recommend 1" length bolts since mine didn't reach the nylon in the nuts, but it was what I already had in my garage. I sealed the case with silicone and foam tape on the seams to try and eliminate all gaps for the best insulation. For the door I just bought door hinges at the depot and I used a soldering iron for all holes in the acrylic because it cracks very easily with a standard drill.
You will need to use my layer fan mount to clear the cabinet.
Here is a link to how I did the lighting in the cabinet if you are interested: https://pinshape.com/items/200...
Loading prints...
Rostock Max v2 Enclosure
Creative Commons Attribution
You can distribute, remix, adapt, and build upon the material in any medium or format, as long as attribution is given to the creator.
 Licensed under CC BY


Loading comments...